Tutorials

Gettin’ Zinc-y

I love wreaths. I said it. It’s out there. Do I always get wreaths switched out? Nope…as in no way on God’s green earth. We currently have a gorg wreath on our front door and it’s not a Christmas one. Some people might see this as an accomplishment. Not this girl…it’s my Halloween wreath. Boo. So I love wreaths in theory. My favorite wreathy lady is Ms. Sweet Georgia Sweet. Have y’all seen her stuff?

Sweet Georgia Sweet on Etsy

Sweet Georgia Sweet on Etsy

What talent! Me? I don’t have the patience and I believe that Bethany must have the patience of a saint…so does anyone who makes jewelry. Seriously, I don’t know how y’all do it. I think the next wreath that dons my door will be ordered not made.

My niece’s birthday party was in February and I decided way too late to make her a wreath. In fact, you may have seen this on Instagram

20130226-112716.jpg

Then it took me about half of forever to write a post. Since I got an iPad I rarely use my laptop anymore and I haven’t figured out how to post from the iPad (forgive me if this turns out bad!)

The whole process started with a wreath form from Michaels like I used for my coffee filter wreath. This time I painted it so if I didn’t cover all of the form with fabric it wouldn’t look as bad.

20130415-142833.jpg

Then I cut strips of fabric about 2×7 1/2 inches and started tying them. I used eight different fabrics in smokey purple, grey and one was a bright pink. I didn’t exactly make them random, but I didn’t make it a specific pattern either. I just made sure they were scrunched together.

I also had some inspiration when I was shopping one day. I was at Laurel (if you live in Cedar Rapids, you have to check this place out) and saw zinc letters. They are just a few inches tall and I wanted a giant E for the middle of the wreath…since her name starts with E. First I painted the letter with a light blue green color then with silver. And when I say I painted it, I mean I told my mom how I wanted it painted and she did it (thanks Mom). Then I took some sandpaper and made it look a little distressed to go along with the whole shabby chic feel of the party.

20130415-145743.jpg

I also found this giant silver flower thing one day and picked it up thinking “I’m going to use this for E’s party somehow.” So I made a hole in the top of the E and clipped the flower onto it.

20130415-150222.jpg

Next step was to attach the E to the wreath. I just hot glued the corners of the E and centered it on the wreath and it was fab

20130415-150546.jpg

The next morning I took it to my brother and SIL’s house and hung it on their front door for the party. That’s right, I decorated inside and outside of their house. Then I proceeded to forget to take a picture of it hanging on the door. Oops! And since I gave Miss E the choice of whether she got to keep it or it came home with me and I rarely say no to my nieces and nephews because I’m that aunt Evalee got to keep the wreath and I had to ask my brother to send me a picture of it.

20130415-151101.jpg

Now I’m making one for my craft room. Since it will just be for me to see it’s taking me a long time due to the aforementioned lack of patience on my part. My letter is copper too so it will go with the copper in our house. Eventually between work, school and family I’ll get it done and show you the pictures. For right now, I occasionally look at E’s wreath and smile because it’s cute…and it reminds me that I have patience…even if it is only with my nieces and nephews.

Categories: Everyone Loves a Party, It's Our Life, Projects, Tutorials | Leave a comment

The Chair Seat Thief

Saturday morning I got a text from my SIL (sister-in-law) Lindsee. She’s pretty good at flattery…she must know it will get her everywhere with me.

Dining Chair Recover22

She sent me a picture that looked something like this one that I took when I got to her house

Dining Chair Recover1

Good thing she sent me the picture. We didn’t need the foam, just the fabric

Dining Chair Recover23

*If you don’t have the JoAnn app on your smart phone, you are missing out! Back to chair cushions. I met Lindsee at Hancock Fabrics on Sunday and we scouted out their remnant table. We found some that we thought matched the paint in their kitchen perfect so we snagged it. BTW, we were right on the color!

Dining Chair Recover7

Six dollars a yard! We got 2 1/2 yards plus an extra fifteen inches they gave her at half price because it was the end. Total for the fabric was less than $18. I’m going to use the extra fifteen inches to make some placemats and probably napkin rings. I’m thinking of giving them to my brother for his birthday. He’ll be thrilled…maybe not. Back to chairs.

We got to Lindsee’s house and got to work. I started taking seats off chairs with some help from my niece Reygan. It was also lunch time and when Auntie Amy takes all the cushions off your dining room chairs, you have lunch on the floor.

Dining Chair Recover6

I’m not mean. I promise. To compensate I brought them cookies. Plus they got to help! Poor Adicyn just wanted to sit in a chair

Dining Chair Recover18

To get the existing chair pads off, I took a screwdriver and unscrewed them from the bottom

Dining Chair Recover2

Then we were left with this

Dining Chair Recover4

…and this

Dining Chair Recover5

I numbered all the cushions and the chairs so we would know which one went where. It might not seem necessary, but it turned out to be good. Nothing is perfect so I knew not all the holes were going to be lined up the same on all the chairs. We could have recovered them one at a time, but then we wouldn’t have a dramatic picture like this one

Dining Chair Recover14

Or this one

Dining Chair Recover13

See? Totally necessary.

Due to the fact that the fabric had stripes, we needed to line it up. My CDO (OCD, but the letters are in alphabetical order like they should be) wouldn’t allow it to be any other way. So I had Lindsee (and Reygan) measure the middle of the seat.

Dining Chair Recover8

She also got to measure a couple kids in the process

Dining Chair Recover9

So I cut around the seats allowing an extra 3-4 inches around each side just to be safe and started lining up

Dining Chair Recover16

Then stapling

Dining Chair Recover11

 Hunter and Adi wouldn’t let Rey play with them. She was pouting (what a cheese)

Dining Chair Recover12

Until I asked her to help me

Dining Chair Recover17

Stretching and stapling and stretching and stapling and folding corners until I was all the way around it

Dining Chair Recover19

When I would get one done, Lindsee would put it back on after Adi would find the chair that matched the seat

Dining Chair Recover20

We also had to take a picture of a bunch of law breakers. That’s right, no tags on these chairs

Dining Chair Recover15

Hunter pointed out that only I would go to jail since I removed all the tags and handed them to them.

But the chairs all got finished and they look fab!

Dining Chair Recover21

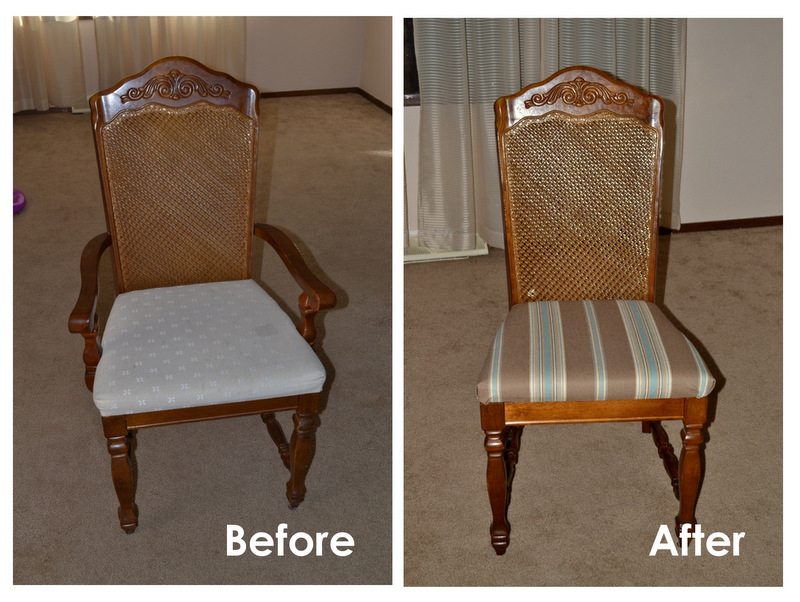
Who doesn’t love a before and after side by side?

Dining Chair Recover B&A

Total cost was $17 (I already had staples for the staple gun). I think that’s pretty good. Thank you Lindsee for letting me invade your house and do this with you. What’s next?!?!?

Categories: Projects, Tutorials | Tags: , | 2 Comments

A Paint Shower – Part 2

Hey look at that, I had ambition. Will wonders never cease? Ready for Bridal Shower part 3 and Paint project part 2?

Last time I left you sitting outside on my deck with this and the promise that I would tell you about what is on this drop cloth with the plates and candlesticks.

Any guesses? A hint? This Instagram picture?

Okay, that’s the only hint you’re getting because it’s a pretty big hint. I hate guessing games so I won’t make you deal with that torture. But you have to promise to never make me play Pictionary or Charades with you.

I saw this thing via Pinterest. I know, I know. Try to contain your shock. Painted beans for vase filler.

Image from g*rated

They used beans, I used peas because I had peas. Next time I will use beans. I’m not sure that this is cheaper than actual vase filler, but I couldn’t find any filler that would have the effect of my ombre obsession so I set off to make my own. I had the paint and the peas and neurotic Amy took over.

I laid them out on the drop cloth and started spraying

Three bags of peas in three different colors – to perfectly match the three colors of cake stands

Then I shook them up a little bit to give them another coat. Something to note: If you don’t let them dry completely first and try to move them around, this happens

I was really happy with the way the dark pink ones were turning out

I’m not sure if it was the paint or the color of my peas but the light pink ones looked pretty white with little bits of pink. Maybe I didn’t shake the can well enough?

Whatever it was, these took sooooooo long to get covered. I ended up calling it good enough. The still looked good in the vase but my favorite part is what the peas left behind on the drop cloth. I have a project in mind where this is the actual intention now

Unfortunately this is the best picture I have of the vase with the filler.

It was used at the wedding too and then I threw it all away because I didn’t want to separate them all out. I think flat paint would work much better than the gloss paint I used for the two pinks. When the painted peas got warm they all stuck together. Next time…yes there will be a next time. In fact I already have a next time in mind. My nephew’s birthday party perhaps in black and Hawkeye gold.

One more paint project and then I’ll show you the whole food table. Seems like a good Friday post to me. What do you think?


Categories: Decorating, Everyone Loves a Party, Projects, Tutorials | Tags: | 1 Comment

Fantasic Damask

It’s true. I kinda love damask. It’s like my catnip really. Ranks right up there with the hubs, the “kids” and s’mores. Way back when during the fall Pinterest Challenge, I had planned to do a planter that I saw on, you guessed it, Pinterest.

Image from Life On the Balcony

I set out looking for a damask patter for a terra cotta pot that I had. I asked what you thought and then decided that it was a whole lotta cutting to do so the project went to the backburner until I could find a damask cartridge for my Cricut or a stencil that fit on my pot. I was looking through my Cricut cartridges not long ago and found one. I don’t know why I didn’t see it the first time but I didn’t. I mean really, I only have six of them. Anyway, I found some things in Ashlyn’s Alphabet that would work out just fine. My damask wasn’t going to be overly intricate like the inspiration one, but it was definitely going to work. My first step was to seal the entire pot. It is important to seal the inside and outside of the pot if you are going to use it for real plants. The reason being that if you water your plants, the clay of the pot will soak up the water and it won’t come through the other side, but it can cause your paint to lift off the pot. So I sealed the whole thing and then I painted most of it white. I only painted the part where my “stencil” was going.

I had some contact paper on hand so I cut a piece to fit onto my mat. I measured around my pot and then divided it by three. I wanted to have my pattern repeat three times and that is the size that I made my first design. I set the pressure on my Cricut to low.

I wanted it to cut through the sticky part of the contact paper but not through the paper backing. I know from previous experience that it’s not easy to peel that paper backing off of the an uber sticky mat. The contact paper just peeled right off

I ended up using two like this and two of another one. I centered them on the pot and took it outside to the deck and my spring/summer painting area. I’m in serious trouble when we get the deck refinished.

I picked out a brownish color. I know that it says London Gray, but trust me, it’s brownish

Then I started painting.

It took a few coats to get a nice even coverage

I let it dry for a day before peeling off the contact paper. Normally I wouldn’t do that, but since I had to paint over the course of a couple days thanks to rain and cold, I waited. I felt like I was five and waiting for Christmas morning. It. Was. Torture. Worth the wait

I heart it. Now I just have to decide what flowers are going to go in there. I’m planting a whole lot of baby’s breath for my brother’s wedding in June. When I say a lot, I mean alot…I have enough seeds to cover a 10’x80′ area. Maybe I’ll plant some in this pot just for me. Maybe I’ll add some red to it. I started some other flower seeds last week. Germination time  scares me. Anyone else? Pictures will come when there’s something to show besides dirt and my pretty pink gardening gloves holding seeds.

Next on the agenda is planter boxes for the deck. Something with a trellis like this

Image from Lumber Jocks

I’d love to grow some veggies in it to snack on while we’re out on the deck enjoying the weather this summer. Yummy. I think I’ll go start building now…

Categories: Best Laid Plans, Projects, Tutorials | Tags: , | Leave a comment

A Chev Ron Ron Ron

Not too awful long ago, I stole the hubs’ dresser and moved it to the entry room so it could be used as a sideboard-type-thing. You might remember that I’ve been begging him to let me paint it. Have you ever heard that the definition of insanity is doing the same thing over and over expecting a different result? Well, I say that all the time and yet there I was doing it myself. Time to rescue myself from insanity. I decided to get a piece of 1/4 inch hardboard and cut it to fit the top and just paint that.

First I had to cut it down. We don’t have a table saw or a miter saw (which are both on my wish list) so sometimes it’s difficult to get straight cuts. My dad and my McDad both suggested that we try the same thing until we get a table saw so I was pretty excited to test it out on this project. To help with the straight cuts, I needed a few extra things

I also used a tape measure. Speaking of tape measure, will someone else please tell me that they keep a tape measure in their purse? Tell me I’m not the only one! If you don’t do it now, you should definitely get one. I love having it so I can measure random things at Menards, Lowes or Home Depot or Target or…well, you get the idea. Anyway, I measured the distance from the blade on the saw to the edge of the saw like this

Then I measured five inches from the cut line that I had drawn on my board and clamped another board there. That way, I just had to keep the edge of the saw against the edge of the board and it was easy schmeezy. Also, when choosing the board to clamp, make sure it is a low enough profile so it fits under the part of the saw that sticks out (the red part on the left of mine in the picture above)

Then just lather, rinse, repeat for the other cut and I ended up with a board that would fit on top of the dresser sideboard. Now, since it was all cut it was time to decide on colors. I knew that I wanted it to be light colors because it’s in a corner and it could easily become a little black hole. When I was painting the cabinet for my revamped creative space I decided to paint the top for the sideboard too. A couple coats of primer then a couple coats of Sherwin-Williams Pro Classic paint in Creamy and it was ready for design! I decided that I wanted to paint chevron. It seriously took me a month to work up the nerve to paint the chevron. Generally speaking, I’m a pretty laid back person. When things go wrong, I tend to not get worked up about it and I just roll with the punches. But I am totally type A for a couple things. One of those is party planning. You might remember that from Ashley’s gender reveal party where I went polka dot crazy.

The other thing is chevron. It drives me bonkers when chevron stripes aren’t even. Different widths and slanting are enough to send me over the edge. Pinterest is full of tutorials on how to paint chevron but I came up with my own because I know the people who wrote those tutorials are so much better at this than I am. I didn’t trust myself to cut tape at the right angles or anything so it took me a month to figure out how I was going to do this. Then we had a colder day where I couldn’t paint outside so I decided to paint on the living room floor while hoping that watching Nate Berkus would help me out. I started by drawing out the chevron pattern on a piece of paper (like I didn’t know what it looked like?)

I decided that I was going to do my stripes the same width as my Frog Tape and I was going to paint them in columns. I took the length of the board and divided it into equal parts that were even. So my board was 41 3/4 inches long. I couldn’t get it to divide into anything easy, so I decided that a stripe on either end that was 7/8 inch let me work with an easier number to divide – 40 divided by 10 gave me 4 inch columns. I taped off the columns on the board keeping in mind that when taping the columns wouldn’t be even

I was painting every other column where the stripes all slanted the same way. Then I started taping. I put my first piece of tape on lining it up with a corner and 4 inches up the side. Then I measured the distance where the tape lines met. The distance between these two arrows was 1 3/8 inches so I just measured up the sides in 1 3/8 increments and put the tape down.

Then instead of doing all that math on all of the sides, I took a piece of scratch paper and make little marks on there for my increments and marked them on the other columns and taped them off. Then I had something like this

Are you seeing it yet? Cause I wasn’t, but I started painting anyway. My second color was grey. I picked up a little test pot from Lowe’s since I wouldn’t need much.

I let it dry and peeled the tape and it was looking a little less chevron and a little more road closed sign

I kept going though. The second set of columns were easier to tape off. I taped over the stripes and I only had to measure on the end. The columns that had stripes on both sides, I just lined up the tape between the white lines on either side of it and painted again.

I peeled the tape after it was dryish and revealed this.

If you’re not careful about taping the second column you’ll get this, but it was nothing a little touch up brush couldn’t cure. You might also notice tat where the two lines meet (where I was careful), there is a texture line. My type A chevron personality came out and I thought I was going to have to repaint the whole blessed thing.

But then when I looked at it from a distance, I couldn’t see the lines so I decided to roll with it.

I mean, it was definitely going to look better than the current top

Two words: In. Love

I moved a few things to the top already, but it is in definite need of styling. I’m on the lookout for stuff, but for now I have the green bowl from Pier 1, the wine rack that the hubs made for me for Christmas two years ago, the electric wine bottle opener that my brother and SIL to be gave me for Christmas this year and the little bin where I save wine corks for  my friend Kayla. Before you think that you need to stage an intervention, that’s probably a year’s worth of corks, not a week’s worth.

See, needs some styling (and I took this picture before the white line touch up too). I also need to find some artsy thing to put there since the art I had planned ended up somewhere else. I’m also on the lookout for new hardware. Last time I was at Hobby Lobby I meant to look at their stash, but I completely forgot. Oh darn, looks like I’ll have to make another trip. C’est la vie.

Anyone else been in totally paint everything mode?  I think every day that it’s been over 60 degrees and not raining, I’ve been outside painting. I have a serious problem. The neighbors are starting to wonder. Maybe not, but they should.


Categories: Projects, Tutorials | Tags: , | 4 Comments

Chalk it Up to Awesome

A couple months ago I was chat chitting with Kristen and Ashley and asked their opinion on a painting project that I wanted to do. Well, a couple weeks ago I completed it. Michael had no idea what I was doing, but knew that it involved spray paint and plastic and our kitchen. I put up all the plastic making my own little paint booth.

Then it was time to start painting (excuse the terrible picture – I took 5 or 6 and not a one was in focus)

Then it was nice thin(?) coats over the whole surface. It looked really splotchy at first

I was nervous, but I kept going and I’m so glad I did. I let the paint dry for a day (like it said on the can) then I took a piece of chalk and colored all over the thing (like it said to on the can)

Then wiped all the chalk off (like it said on the can)

Yikes, I really need to paint the door in the kitchen. But then it was ready to be written on!! Michael looked at this and said “Are you talking to me or the chalkboard?” Honestly, it’s both.

Did you notice that the top was a little bit different color? I had plans for a piece of art up there so I wanted it to be solid black. It’s all the same paint, but you can really see the difference between the before prep and after prep.

One day when I was perusing Pinterest (like I do most days) and fell in love with a printable that I found on there. She actually had three of them, but you can probably guess which one I printed by looking at the insides of my cabinets

click on the image to get these great printables that Lisa created


I found this frame at a local store for just $4!

I love big thick chunky frames so I was pretty jazzed to find this one. The color was all wrong, so it got a coat of white paint…actually it got about 27 1/2 coats of white paint. I primed it then painted it. The only white paint I had on hand was some cheap-o stuff that we got for 99 cents at Menards. I love the Rust-oleum Painter’s Touch (like I used on the chair swing and the Valentine’s Day frame) and that’s usually what I get. Next time I won’t even bother with the 99 cent stuff even if I do have it. It seriously took me 3 or 4 days to get this little bitty frame primed and painted. Once it was painted and dried I put my artwork in and ripped the easel stand off the back so it would stay flat on the cabinet

Then hung it up. I tried command strips and I’m not sure if it was because of the weight of the frame or the texture of the chalkboard paint, but it didn’t stay up. I recommend a nail. I totally love how this looks.

You’ll notice that I didn’t have my plastic paint booth fully covering my wall. I need to get some latte paint to touch that up. I’m not sure what else we will write up there. Our annual family dinner is this Saturday, maybe I’ll write the menu up there so everyone knows what we’re having…and I’ll know what I’m supposed to be cooking for 17 of my favorite people.

Anyone else have chalkboards in random places in the homes? How about that printable from Over the Big Moon? Do you love them? Are you going to print one?


Categories: Projects, Tutorials | Tags: , | Leave a comment

Cowgirl Up!

So, did you figure it out? Yesterday I showed you this picture and told you the tutorial was coming. If you had this pile of stuff, what would you make?

If you’ve perused my “Because I’m Fun Auntie Amy” board on Pinterest, you probably know. Or if you’re friends with my SIL on facebook, you probably know too. But for those that don’t, it’s a horse…two actually. I originally found the idea on Pinterest (pin here). Charlie from Attempting Aloha does a great tutorial on how she put hers together. We did a few things different, so I thought I’d give you our step by step. Normally I wait till the end to show you the reveal picture, but there are quite a few pictures and steps in this tutorial so you’ll have to keep your eye on the prize. In the words of Katie Bower, I think they are awesomesauce.

Let’s dive right in, shall we? Here’s a list of the supplies (and the cost-ish)

  • Fuzzy Sock – $1 at Dollar Tree (It’s hit or miss at ours)
  • Yarn – $2.50 at Hancock Fabrics
  • Googly Eyes – $1 at Hobby Lobby
  • Feather Boa – $7 at Hobby Lobby
  • Fake Eyelashes $1 at Dollar Tree
  • Glitter Foam (1 sheet each of white and a color) – $2 each
  • String of beads – $1 at Dollar Tree
  • Flower for her “hair” – $3 at Michaels (we bought a bunch of five and now have four left over)
  • 3/4″ dowel rod about 3 feet long ish – $2 at Michaels
  • White spray paint – $1 at Menards
  • Glue gun – $2 at Michaels
  • Glue sticks – $1 at Dollar Tree
  • Fiber fill – $5 at Hancock Fabrics
  • Chair tips – $2 at Menards

First, paint your dowel rod so it can be drying while you’re doing the rest of the horsey. We stuffed the sock with the fiber fill. Don’t be afraid to stretch it to the limits

Then we decided to sew the nostrils. Wrong decision. We couldn’t figure out where exactly to put the nostrils, so we made the bridles. We liked the look of a braided bridle so we took six pieces of yarn and braided them and then tied it onto our horses, just to give us something to gauge distance by. Then using yarn and an upholstery needle We made nostrils

I tied a knot and went into the sock where it would be covered by the bridle and then made the shape of the nostril and went back through the sock and tied another knot under the bridle.

With the nostrils done, I stitched the bridle to the sock by kind of weaving yarn through it. Then I glued the bridle in place to cover the knots. I used hot glue on the chin side of the horse

Then I stitched around it creating a “buckle” just to hide the hot glue

Then we added the dowels so we knew where to place all the other bits and pieces that are being glued and sewn to this poor sock. This wasn’t difficult to figure out, but it was critical. You know that anytime you’re doing a DIY project, you’re bound to think afterwards “Next time I’ll do [insert after-the-fact-idea here]”. Well, gluing the dowel was one of those things. We put a post of glue on the top of the dowel (forgive the very blurry picture, we were moving fast

My do over moment would be to add a line of glue down the side of the dowel too in an effort to help the horsey head stay in place a little better. But, this worked too. We made sure there was some fiberfill between the sock and the top of the dowel, but the dowel was pushed all the way into the heel of the sock. That gave it quite a bit of stability.

Getting the sock horsey neck stuck to the dowel rod we pleated it on the back side that would be covered by the mane and sewed it shut.

Then we glued in small sections around the dowel rod and stuck the edge of the sock on top of the glue line so there was no ugly glue peeking out of the sock

You’ve made it halfway! This is the point where you will want to pause and take a picture and get another cup of coffee. My mom was working on the purple one and I was making the pink one. We were making these for my niece for her birthday and we made two so when her cousin (my niece) or another friend comes over to play, they each have one to play with.

Alrighty, let’s move on. Next up were the ears. Here’s the pattern we used (along with a couple that were cut out). They are three inches wide and three inches tall…or the size of a post it note. We traced four ears for each, two on the color and two on the white.

The reason we did this is because the glitter foam we got was sticky backed so it needed something on both sides. Hello, happy accident.I loved the look of the white ears with the pink and purple inside

We put the mane on (without attaching it) to gauge where we wanted to put the ears. We also decided that with the mane covering the bottom of the ear so much, we folded the ears completely in half. Once the ears were sewn on, we also glued the sides so they would stand up the way we wanted them to.

Then pause for another picture. Kinda looks like a glamor donkey here…

The next step was adding the mane. We cut it into two pieces and because these have a tendency to unravel we hot glued the ends. We wanted the mane to cover up where the ears were attached, so we started by wrapping the boa around the back of the ear and going to the front.

We used yarn to attach the mane, just making tight loops around the boa

Then the boa went back around the ear and was sewn to the middle of the head between the two ears.

Then I pulled the other end up to the outside of the ear, making a sort of loop. We repeated that with the other piece of boa around the other ear. So close to done!!! We took apart a fake flower and hot glued it back together. I know that might seem crazy, but work with me here. We didn’t want to yellow middle of the flower, we wanted something glitzy. We cut a circle(ish) piece of glitter foam for the middle. This also allowed us to sew the flower on instead of just hot gluing. We made a knot under the flower, went through the sock and the middle of the flower and tied another knot. A little bit of glue and the glitter foam was added.

This is where my camera battery went kaput. I know, I know. Bad tutorial writer. But the rest of this is pretty self-explanatory. I will give you a couple pieces of advice. The next step was adding the halter. We stitched four beads back and attached with yarn…hiding the knots under the bridle again. If that bridle ever comes off, you’re going to see a multitude of sins. Then the eyes have it. We glued the eyelashes to the backs of the eyes with hot glue. Cautionary tale: If the tip of the glue gun touches the back of the eye or if you use too much high temp hot glue, the back of the eye will bubble a little bit. Then we glued the eyes to the horses and we thought they were done.

One last finishing touch was chair tips to the bottom of the dowel rod to help protect the horses and little fingers from slivers. One little girl was pretty excited to get them and to start playing with her friend.

She got some red cowgirl boots from her mom and dad too. How perfect.

After a lot of playing, sometimes horses just get tired and need a nap.

They were really pretty easy to do. The hardest part was making sure the horses had even nostrils, ears and eyes. I have plans of making more. I think we should have a whole stable for the nieces and nephews when they come to visit our house.

Be honest, was that the longest tutorial you’ve ever read? Was it worth it? Are you going to make one? As always, I want to see it if you do!

Categories: Projects, Tutorials | Tags: , | 1 Comment

What’s so (P)Interesting?

Have you seen what’s been sweeping through Pinterest yet? It’s a bucket list and I totally just caved and started my bucket list board.  I just started this board, but I’m having fun going through the images. Here are some of my favorites.


You don’t need to be on Pinterest to look, but if you want to start your own virtual idea books, you’ll need an invite. If you’re not on Pinterest and want to be, you can request an invite through them (which can sometimes take a week or more) or you can send me your email address to thisDIYlife@gmail.com and I’ll send you an invite in no time!

Maybe you’re on Pinterest but you’re not on Pinterest. Last night I was at book club with some fabulous ladies from church and  two of my friends said “I don’t get how to use it”. I believe that everyone should know how to use Pinterest and since I’ve heard this more than once, I’m going to do a tutorial for y’all. Heidi and Sarah, this one’s for y’all! After you get an invite and sign up you’re ready to start pinning and following and finding so much inspiration everywhere. This is totally going to be just the basics to get started.

When you log into Pinterest you’ll see pins from people you follow so the first thing you need to do is find people to follow. You can start off by following me! When you click on someone’s name it will take you to their Pinterest page. Just to show you what it looks like, I went to EverAfter Blueprint’s page.

Let’s say that you want to follow Andrea and Laura on Pinterest, you can do that in two different ways.

  1. You can follow all their board with just one click by choosing “Follow All”
  2. You can pick and choose which boards to follow

Then when you follow them all it will look something like this

So now that you are following Andrea and Laura and you’re following me when you go to the Pinterest homepage (and you’re logged in)it defaults to show you the pinners you follow

Then if you see something that just so fabulous that you want to repin it or like it or comment on it, you can put your mouse over the pin and three little boxes will appear and you can click on one of them. This is one that my friend Kristen pinned for me

If you click repin a box like this will pop up and you can choose the board you want to pin it to (existing or create a new board). You can also change the description of the pin. If you have your Pinterest account linked to your facebook or twitter account, you can choose to share them there too

Now you can pin! If you want to find more people you can invite your friends or find your friends. Just click hover on your name in the right corner

You can invite friends through with an email address or through facebook (if your account is linked). You can also find friends that are already on Pinterest. Boards will take you to your boards, pins to your pins, likes to your likes. That’s easy right? If you just click on your name instead of hovering it will take you to your own profile page. Here’s mine

There’s a lot going on here so I’ll break it down for you

  1. Your name
  2. People following you and people you are following – you can click on either one to take you to see those lists
  3. Your picture – that’s me and my moms at a 5K race against breast cancer
  4. Click on this button to edit your profile stuff like login info, name, facebook, twitter, website, etc.
  5. This is where people can find you – the globe takes you to my blog, the bird to twitter, the “f” to facebook and the RSS button will take you to subscribe to my feed
  6. This is where you can see what you’ve been doing – comments and likes

  1. Search for pins or people here – if you want s’more recipes, you can just type s’more in this box
  2. Clicking here will take you back to your homepage where you see pins from people you follow
  3. Click here to see your boards…unless you’re already looking at your boards (this is the defualt)
  4. This will take you to see all your pins – these are in the order you’ve pinned them with the newest first and doesn’t have them in categories
  5. These are the pins that you’ve “liked”

When looking at your boards, you can click to edit them. There you can change things like the description of your board or the name of it or the category. If you just want to see your ideas that you’ve pinned, you can click on your board to see the pins on the board

If you pin something and forget to change the description, you can do that when you’re viewing the board. Just hover over your pin like you would do to repin or like and you’ll notice there is an edit button instead of a like button now. Clicking on it will take you to this

Plenty of things you can change here! Let’s say that you click on a pin and it doesn’t take you where you thought it would. If you find the right place, you can change the web address of where it’s found right there.

I think that’s enough to get you started on Pinterest. Please if you have any questions about how to do things, let me know. I’ll be happy to add things to this tutorial or do another one if I get enough questions. I totally love Pinterest and I think that you will too. Now, I’m off to work on my bucket list!


Categories: Tutorials | Tags: | Leave a comment

Blog at WordPress.com.